


Running a successful WooCommerce store demands constant customer communication. But here’s the challenge: manually sending emails for every order, abandoned cart, or follow-up can consume hours of your valuable time.
That’s where WooCommerce automated emails become your secret weapon.
By automatically sending the right message at the right time, you can maintain meaningful customer relationships while focusing on growing your business.
In this blog post, we’ll explore why WooCommerce automated emails are essential for your online store and how to send WooCommerce automated Emails.
Additionally, you’ll discover the best practices for ensuring they resonate with your audience.
By the end, you’ll have a clear roadmap to enhance your email marketing automation efforts and keep your customers engaged.
Key Takeaways:
- Learn what WooCommerce automated emails are, how they work, and the importance of using them to streamline customer communication.
- Discover why sending automated emails in WooCommerce is essential for improving customer engagement, increasing open and click-through rates, and saving time in your marketing efforts.
- Gain practical knowledge on setting up WooCommerce automated emails.
- Understand the importance of creating personalized email campaigns using dynamic content and customer segmentation.
- Explore various types of automated emails you can send.
- Learn the best practices to optimize your automated emails for higher open rates and conversions.
- Identify common automation challenges and implement solutions.
What are WooCommerce Automated Emails?
WooCommerce automated emails are pre-scheduled messages sent automatically based on specific triggers or customer actions.
These automated Emails include anything from a purchase confirmation to a reminder about an abandoned cart.
The beauty of automated emails lies in their ability to deliver timely and relevant messages without requiring manual intervention.
Automated emails in WooCommerce are set up through carefully designed workflows that define when and to whom the emails are sent.
By leveraging these workflows, store owners can ensure consistent customer communication while saving time and resources.
With the right configuration, WooCommerce automated emails can significantly boost customer engagement and retention.
Why Send Automated Emails in WooCommerce?
Sending automated emails in WooCommerce is more than just a convenience. It’s a strategic move that can drive growth for your online store.
Boosting your online store’s profits just got easier with WooCommerce automated emails!
Research indicates that automated emails achieve open rates that are 70.5% higher and click-through rates that are 152% greater compared to traditional emails.
Why settle for standard email blasts when you can send automated or triggered emails that deliver results tailored to your customers’ actions and interests?
Here’s why you should consider integrating automated emails into your marketing strategy:
1. Enhanced Customer Experience
Automated emails enhance customer experience by providing timely information and updates. From order confirmations to shipping updates, these emails keep customers informed and reassured, reducing potential anxiety about their purchases.
2. Superior Engagement Rates
Because automated emails respond to specific customer actions, they’re inherently more relevant and personalized.
A customer who just abandoned their cart is far more likely to open an email about those products than a generic promotional message.
3. Operational Efficiency
Automated emails help streamline your marketing efforts. Automating repetitive tasks like follow-up messages and feedback requests frees up valuable time to focus on other aspects of business growth.
This efficiency is crucial for scaling operations and maintaining consistent customer engagement.
How to Send WooCommerce Automated Emails Using ShopLentor’s Email Automation Module
For WordPress users seeking to optimize their WooCommerce store’s email marketing, ShopLentor’s Email Automation Module offers a powerful yet user-friendly solution. It’s user-friendly and packed with features. Many automated email plugins exist, but ShopLentor stands out with seamless integration.
This comprehensive guide will walk you through the setup process and best practices for creating effective automated email campaigns.
Setting Up ShopLentor Email Automation
Installing and Activating ShopLentor
For Free Version
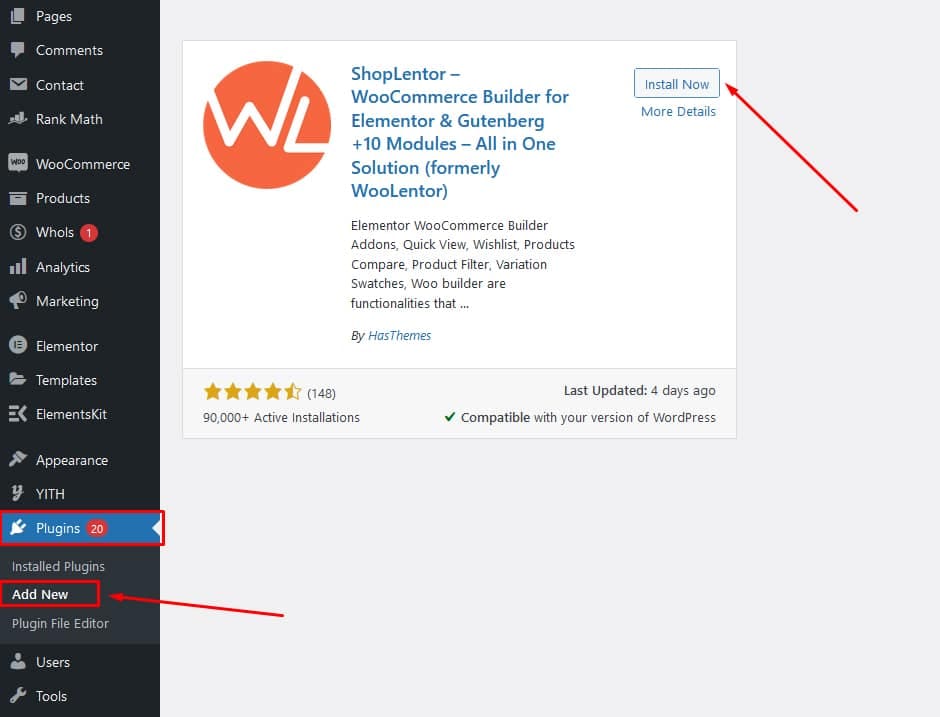
- Go to Plugins from WordPress Dashboard.
- Click on Add New
- Search for Plugin “ShopLentor”
- Click on Install and Activate the plugin
To add the Pro version,
- Purchase and Download it from the official website.
- Navigate to your WordPress dashboard.
- Go to ‘Plugins’ > ‘Add New’.
- Navigate to your WordPress dashboard, go to ‘Plugins’ > ‘Add New,’ and upload the ShopLentor zip file.
- Upload the ShopLentor zip file.
- Once installed, click ‘Activate’ to enable ShopLentor on your WooCommerce store..
Upon activation, you’ll notice a new “ShopLentor” menu item in your WordPress dashboard. This is your gateway to configuring and managing all aspects of your WooCommerce email automation.
Note: To learn more about how to install ShopLentor Pro. Please check here.
Initial Configuration Steps
To initiate the setup:
- Navigate to ‘ShopLentor’ > ‘Settings’ > ‘Modules’
- Turn on the “Email Automation” module and save the changes.
- Ensure that the sender’s name and email address are configured correctly.
Creating Automated Email Campaigns
Now that ShopLentor is set up, it’s time to create your first automated email campaign. Select the “Create New Campaign” option and choose the type of email you wish to automate.
ShopLentor offers various options, including welcome emails, order confirmations, and more. Each campaign requires specific parameters, such as the email subject, content, and recipient criteria.
Understanding Campaign Types
WooCommerce automated emails can serve different purposes, each with unique campaign types. Understanding these types helps you tailor your messages effectively:
- Welcome Emails: These introduce new subscribers to your brand and highlight key offerings.
- Order Confirmation Emails: Sent immediately after a purchase, confirming details and providing reassurance.
- Shipping Notification Emails: Inform customers about the status of their shipment, reducing inquiries.
- Abandoned Cart Emails: Encourage customers to complete their purchases with personalized reminders.
- Product Recommendation Emails: Suggest related products based on past purchases, boosting cross-sell opportunities.
Designing Your Email Template
Template design plays a crucial role in campaign success. You can start with a pre-designed template or create one from scratch.
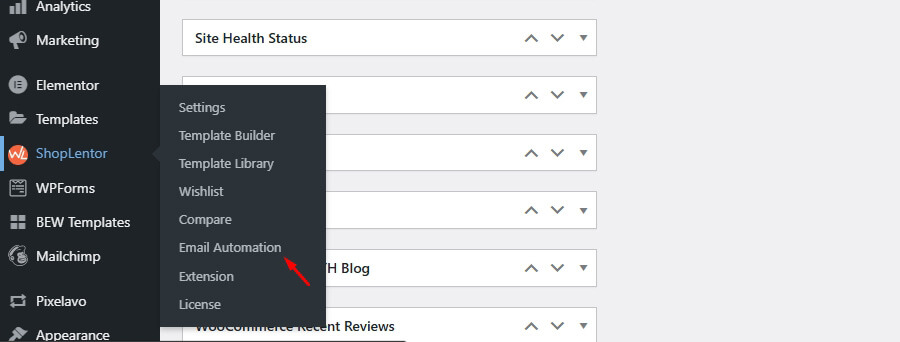
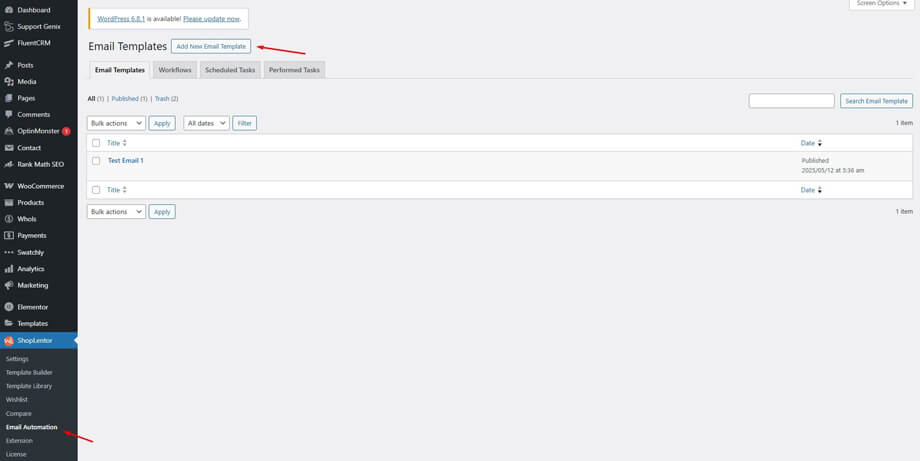
Go to ShopLentor > Email Automation > Email Templates.
Click “Add New” to create a template.
ShopLentor’s intuitive drag-and-drop editor makes it simple to customize your template’s appearance, from layout and colors to calls-to-action and images.
ocus on creating visually appealing templates that capture attention. Use dynamic placeholders to insert personalized content like customer names. Keep your messaging concise and impactful.
Include high-quality product images to enhance visual appeal. Preview and test your email on multiple devices before saving it.
Trigger-Based Email Automation
Trigger-based automation serves as the foundation for delivering timely, relevant emails to your customers. By responding to specific customer actions and behaviors, these automated messages create meaningful connections that drive engagement and sales.
What are Triggers?
Triggers are predefined conditions that initiate your automated emails. These can range from a customer’s first visit to your site to their decision to abandon a shopping cart.
The key lies in understanding your customer journey and identifying the crucial moments when automated communication can provide the most value. Triggers help you send the right message at the right time.
Setting Up Triggers in ShopLentor
In ShopLentor, setting up triggers involves selecting the conditions under which an email is sent.
Go to ShopLentor > Email Automation > Workflows.
Create a new workflow and choose an event trigger, such as “Order Created.” Configure rules and set the timing for sending emails.
For instance, you might set up an abandoned cart trigger to send a recovery email 24 hours after a customer leaves items in their cart.
Experiment with different triggers to find the best combination for your audience. Then, based on performance data and feedback, regularly review and refine these triggers to ensure they meet your evolving needs.
Personalizing Your Automated Emails
Personalization is a key factor in the success of your automated emails. By tailoring messages to individual recipients, you create a more engaging and impactful experience.
Using Dynamic Content
Dynamic content refers to elements within an email that change based on the recipient’s data or behavior. This could include their name, previous purchases, or browsing history. Incorporating dynamic content makes your emails feel personalized and relevant.
Personalization Techniques
Personalize your emails using placeholders that pull in dynamic data, such as :
- Use Customer Names: Start emails with the customer’s name to grab attention.
- Tailor Recommendations: Suggest products based on past purchases or browsing history.
Segmentation and Targeting
Segmentation divides your audience into smaller, more manageable groups based on shared characteristics. Effective segmentation enables you to send targeted messages that are more likely to resonate with specific segments.
Importance of Customer Segmentation
Segmentation improves the relevance of your automated emails, leading to higher engagement and conversion rates. By understanding your audience’s preferences and behaviors, you can craft messages that cater to their unique needs.
For instance, segmenting customers based on purchase history allows you to send product recommendations aligned with their interests. This approach increases the likelihood of repeat purchases and fosters brand loyalty.
How to Segment Your Audience in ShopLentor
- Identify Segments: Group customers based on demographics, purchase history, or engagement level.
- Create Segments in ShopLentor: Use the segmentation tools in ShopLentor to define and manage your customer groups.
- Apply Segments to Campaigns: Ensure each campaign targets the appropriate segment to maximize effectiveness.
Read More: How to Set up Email Notifications in WooCommerce
Types of Automated Emails to Send in WooCommerce
Creating a diverse range of automated emails enriches your customers’ interactions with your brand. Here are some essential types of automated emails to consider:
Welcome Emails
Welcome emails make your first impression. They set the tone for future interactions. Use this opportunity to introduce your company, highlight unique selling points, and express gratitude for joining your community.
Include links to relevant content or resources, encouraging newcomers to explore your offerings. A warm and informative welcome lays a solid foundation for lasting customer relationships.
Order confirmation emails
Order confirmation emails serve as receipts and reassure customers. They reassure buyers that their purchases were successful. They include order details, delivery estimates, and contact information for inquiries.
These emails also present an opportunity to cross-sell by suggesting related products or offering discounts on future purchases. A well-crafted order confirmation email reinforces trust and encourages repeat business.
Shipping notification emails
Send shipping notification emails to keep customers informed about their order status. These updates reduce anxiety and minimize inquiries about delivery times.
To enhance engagement, include tracking links and estimated delivery dates. Adding a personal touch, like signing off with a team member’s name, further humanizes the interaction.
Abandoned Cart Emails
Abandoned cart emails target customers who leave items in their shopping carts without completing the purchase. To encourage conversion, remind them of the items they left behind and offer incentives, such as discounts or free shipping.
Timing is crucial for abandoned cart emails—send them within a few hours of the cart being abandoned for optimal results. Personalize these emails by addressing customers by name and referencing specific products they viewed.
Product recommendation emails
Use purchase history to send personalized product recommendations. Highlight complementary items or new arrivals matching customer interests.
These emails increase sales through targeted suggestions. They show you understand customer preferences. By showcasing relevant products, you position your brand as a reliable source for their needs.
Customer feedback request emails
Gathering feedback from your customers is crucial for enhancing your products and services. Feedback requests prompt customers to share their thoughts on recent purchases or interactions.
Keep these emails concise and include a direct feedback form or survey link. Express appreciation for their input and assure them that their opinions matter.
Follow-Up Emails
Follow-up emails nurture ongoing relationships with your customers. These can include thank-you notes after a purchase, upcoming event reminders, or exclusive promotional invitations.
Consistent follow-up demonstrates your commitment to customer satisfaction and keeps your brand top-of-mind. Vary the content and frequency of follow-up emails based on customer engagement levels.
Read More: How to Fix WooCommerce Not Sending Order Emails
Best Practices for Creating Effective Automated Emails in WooCommerce
Crafting effective WooCommerce automated emails requires thoughtful planning and execution. Here are some best practices to ensure your emails resonate with recipients:
Personalizing automated emails for your customers
Personalization goes beyond addressing recipients by name. Tailor the entire email experience to match their preferences and needs. Use data-driven insights to refine your messages and improve engagement.
Experiment with different personalization techniques and monitor results to identify what resonates most with your audience. Regularly update and optimize your strategies to maintain relevance.
Using compelling subject lines and email content
Capture your readers’ attention with compelling subject lines that pique curiosity or highlight benefits. Keep subject lines concise and aligned with the email’s content.
In the body of the email, focus on delivering value through clear and concise messaging. Use visuals strategically to enhance understanding and engagement without overwhelming the reader.
Optimizing automated emails for mobile devices
Optimization is crucial with many users accessing emails on mobile devices. Ensure your email templates are responsive and display correctly across various screen sizes.
Test your emails on different devices and email clients before sending them to ensure a seamless experience. Simplify navigation and ensure call-to-action buttons are easily clickable on mobile.
Sending Follow-up emails regularly
Consistency is key when it comes to follow-up emails. Determine an appropriate frequency that aligns with customer expectations and engagement levels.
Avoid bombarding recipients with excessive emails, which may lead to unsubscribes. Instead, aim for a balance that maintains interest without overwhelming their inbox.
Testing and analyzing the performance of your automated emails
Regularly test different elements of your automated emails, such as subject lines, visuals, or calls to action. A/B testing allows you to identify what works best and refine your approach accordingly.
Monitor key performance metrics, including open rates, click-through rates, and conversion rates. Use this data to make informed decisions about future campaigns and improve overall effectiveness.
Common Challenges and How to Overcome Them
While automated emails offer many benefits, be aware of potential challenges. Here are common obstacles and strategies to overcome them:
Avoiding Spam Filters
To prevent emails from being marked as spam, follow best practices. Use a reputable email service provider. Regularly clean your email lists by removing inactive subscribers.
Never buy email lists. They often contain spam traps and invalid addresses. Avoid spammy language and excessive symbols or capital letters.
Ask recipients to add your domain to their safe sender list. Review bounce and unsubscribe rates regularly to identify potential issues.
Managing Unsubscribes
Unsubscribes happen, but manage them effectively. High unsubscribe rates may signal problems with your email strategy. Review content relevance if rates increase.
Segment your list for more personalized content. Balance email frequency to prevent overwhelming subscribers. Always provide a clear unsubscribe link.
Ask for feedback from unsubscribers. This helps improve your future email strategy and content.
Handling Email Bounce Rates
High bounce rates harm your sender reputation. This can send your emails to spam folders. Clean your email list regularly by removing invalid addresses.
Monitor your sender score to address deliverability issues. Authenticate emails using SPF, DKIM, and DMARC to confirm legitimacy.
Avoid spam trigger words and excessive punctuation. Implement double opt-in to ensure accurate email addresses. Watch bounce rates closely and take corrective action.
Read More: Best Email Subscription Popup Examples.
How to Set Email Automation in WooCommerce Using WooLentor
Frequently Asked Questions
Does WooCommerce Have Email Automation?
How are automated emails sent?
How to automate emails in WooCommerce?
Why should I use WooCommerce email automation?
Can I personalize my WooCommerce automated emails?
Conclusion
WooCommerce automated emails are a powerful tool for enhancing your online store’s communication strategy.
By leveraging these emails, you can provide timely and relevant information to your customers. It improves engagement and drives sales.
ShopLentor’s Email Automation Module simplifies the setup process, making it accessible to WordPress users of all skill levels.
Remember these key points:
- Personalize your emails.
- Optimize for mobile devices.
- Analyze performance metrics regularly.
Follow best practices and overcome common challenges. With these strategies, your automated emails will fuel your store’s growth.
Ready to take your WooCommerce email automation to the next level? Explore ShopLentor today and unlock the full potential of your automated email campaigns.