


Checkout is the final hurdle in online shopping before a sale is completed. It’s the point where you convert visitors into paying customers.
However, Quicksprout says 63.23% of eCommerce shopping carts are abandoned. This reveals many online shoppers who initially decide to purchase but reconsider at the final moment.
WooCommerce, a popular eCommerce platform for WordPress users, offers a robust system out of the box. However, optimizing and customizing the WooCommerce checkout fields can significantly enhance the user experience and potentially increase your conversion rates.
In this post, we’ll explore how to customize WooCommerce checkout fields to suit your business needs better and provide a smoother checkout experience for your customers.
Takeaways
- Customization of checkout fields significantly reduces cart abandonment rates.
- Fields management allows strategic removal or addition based on business needs.
- Third party plugin enables comprehensive checkout field customization without technical expertise.
- Organization of checkout fields enhances user experience and conversion rates.
- Best practices ensure optimal implementation of checkout field modifications.
What is WooCommerce Checkout Fields
WooCommerce checkout fields are the customizable form fields that customers fill out when they complete their purchase on a WooCommerce-powered website. These include name, billing address, shipping address, email, phone number, and payment details. By default, WooCommerce provides a set of standard fields that cater to a basic checkout process.
Why Do You Need to Customize Your WooCommerce Checkout Page?
Personalizing your checkout form to fit your specific requirements can dramatically boost the checkout process’s efficiency and relevance. It makes every transaction smooth and tailored just for you.
Depending on your product offerings and niche market, you may benefit from including specialized fields to gather valuable insights or customer preferences. For instance, if you sell beauty products, incorporating a “Skin Type” or “Hair Texture” field can help you recommend suitable products and enhance the personalized shopping experience.
Similarly, adding a “Favorite Genre” field for an online bookstore can enable targeted recommendations and promotions based on customers’ reading preferences.
By tailoring the checkout page to meet your specific needs, you can:
- Enhance Branding: Customizing the checkout page ensures consistency with your brand’s visual identity, reinforcing brand recognition and trust.
- Improve User Experience: A personalized checkout page can simplify the ordering process, making it more intuitive and user-friendly for customers, which can reduce cart abandonment rates.
- Gather Relevant Information: By adding or modifying checkout fields, you can collect additional information from customers that may be crucial for order fulfillment, marketing purposes, or compliance with legal requirements.
- Offer Additional Services: Customizing the checkout page enables you to integrate additional services such as gift wrapping, special delivery instructions, or optional product add-ons, enhancing the overall shopping experience.
- Optimize Conversions: Tailoring the checkout experience based on your target audience’s preferences and behavior can help increase conversion rates by removing distractions and reducing friction points during checkout.
Easy Two Methods to Edit WooCommerce Checkout Fields
There are two methods to customize your WooCommerce checkout fields: using the WooCommerce settings or installing a third-party plugin. Let’s explore both options in detail.
Using WooCommerce Settings to Customize Checkout Fields
WooCommerce itself provides built-in functionality for customizing checkout fields. By navigating to the WooCommerce settings in your WordPress dashboard, you can easily access options to rearrange, add, or remove checkout fields.
This method offers a straightforward approach for making basic adjustments to the checkout page without the need for additional plugins or coding knowledge.
You can streamline the checkout process and optimize it for your store’s requirements through simple settings configurations.
WooCommerce includes essential checkout fields by default, such as billing details, personal information, address, contact details, and order notes.
However, this method is limited and might not offer the flexibility you need for more advanced customizations.
Installing and using third-party plugins
For more advanced customization options and enhanced flexibility, third-party plugins such as ShopLentor offer comprehensive solutions. Installing and activating the ShopLentor plugin allows you access to powerful features designed to manage checkout fields in WooCommerce.
With ShopLentor, you can effortlessly rearrange, remove, or add new fields to the checkout page, allowing for a highly personalized and optimized checkout experience.
The plugin’s intuitive interface and extensive feature set make it easy to implement complex changes and tailor the checkout process to match your brand’s unique requirements.
Follow this link to explore ShopLentor’s full range of advanced customization options: ShopLentor Checkout Field Manager.
Benefits of Using ShopLentor Checkout Field Manager Module
The ShopLentor Checkout Field Manager Module offers a range of benefits to enhance your WooCommerce store’s checkout process:
Streamlined Checkout Experience
With the Checkout Field Manager Module, you can easily customize and manage checkout fields, streamlining the entire checkout process for your customers.
Remove unnecessary fields, rearrange their order, or add new ones per your business requirements, ensuring a clean and efficient checkout flow.
Improved User Experience
By managing the fields on your checkout page, you can enhance your customers’ overall user experience.
Customize the checkout fields to match your brand identity and meet customer preferences. This creates a seamless and intuitive checkout process that minimizes friction and maximizes customer satisfaction.
Increased Conversions
A smooth and user-friendly checkout experience can significantly impact conversion rates. With ShopLentor’s Checkout Field Manager Module, you can optimize the checkout page layout to encourage conversions.
By strategically arranging and customizing fields, you can reduce cart abandonment rates and drive more successful transactions.
Flexibility and Control
The module offers unparalleled flexibility and control over your checkout page.
Whether you need to add custom fields, edit existing ones, or delete unnecessary options, ShopLentor empowers you to make changes effortlessly without any coding knowledge.
This flexibility allows you to adapt your checkout process to meet changing business needs and customer expectations.
Time and Cost Savings
By providing a user-friendly interface for managing checkout fields, ShopLentor saves you time and resources that would otherwise be spent on manual coding or hiring developers.
With quick and easy customization options, you can optimize your checkout page without investing significant time or money.
How to Customize WooCommerce Checkout Fields using Shoplentor
There are a few different ways to add extra fields to WooCommerce checkout page. However, one of the easiest is to use the ShopLentor plugin.
This plugin offers a straightforward interface for adding new fields to the checkout page, and it also enables you to manage the order of these fields. The WooCommerce checkout field editor is a fantastic module that allows you to customize the fields on your checkout page.
The ShopLentor Checkout Field Manager Module offers a comprehensive solution for optimizing your WooCommerce store’s checkout process.
This powerful tool equips you with the capabilities needed to create a seamless customer checkout experience.
Now, we will guide you on how to customize WooCommerce Checkout Fields using ShopLentor.
Step 1: Install and Activate ShopLentor
First, install and activate the ShopLentor plugin.
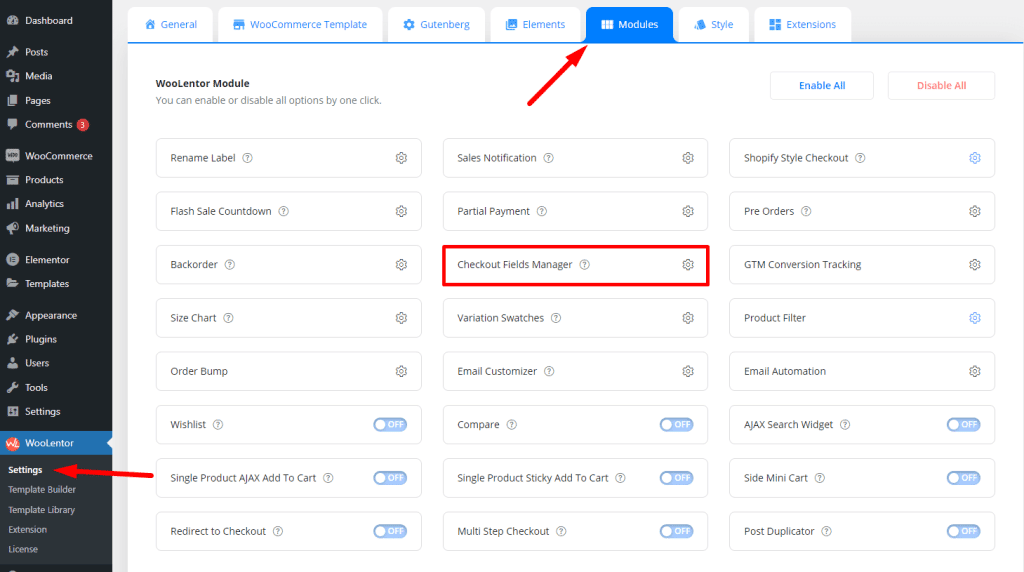
After activation, go to ShopLentor Settings from your WordPress Dashboard.
Now select “Modules” and enable “Checkout Fields Manager.” This feature allows you to manage your checkout fields effortlessly.
Step 2: Remove Unnecessary Checkout Fields
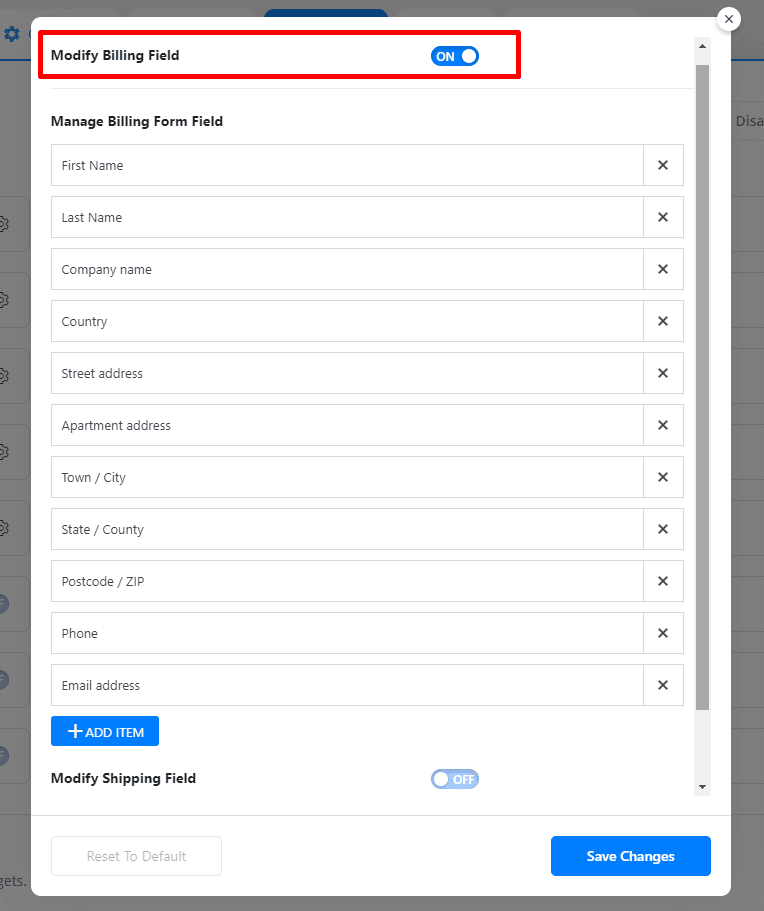
When you turn on the “Modify Billing Field” option, all of the checkout fields will be visible. If you wish to delete any fields, simply click on the cross symbol next to them.
Step 3: Add the Checkout Fields You Need
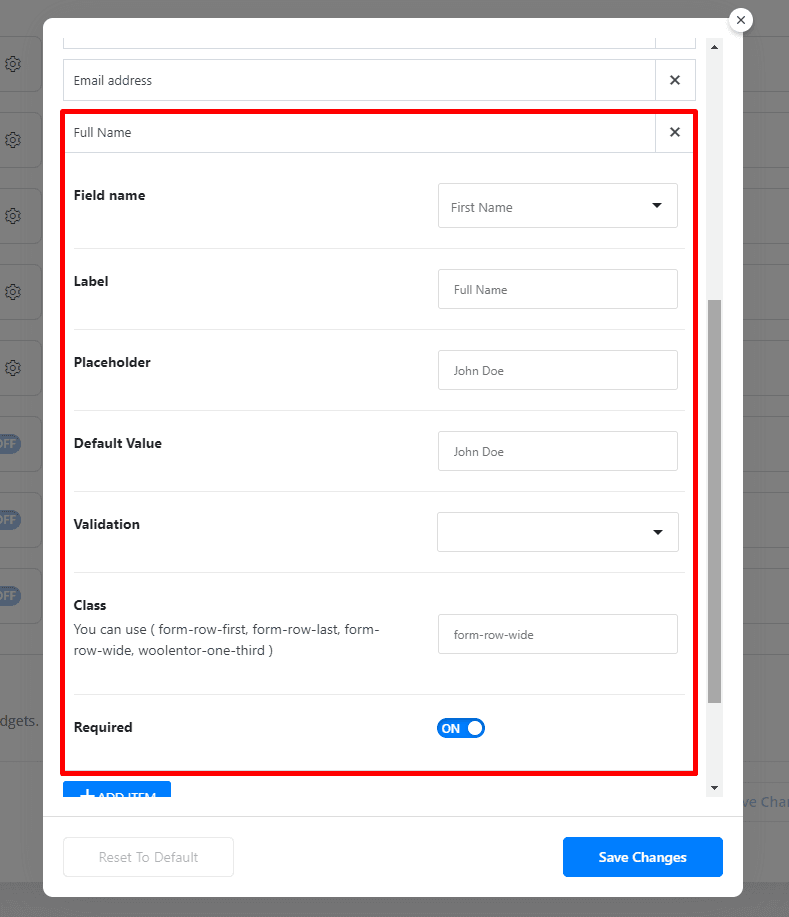
When your store requires additional information from customers, you’ll need to create custom checkout fields to gather these details. ShopLentor makes this process straightforward with its intuitive field creation interface.
Begin by locating and clicking the “+ADD ITEM” button in the interface. This opens the field configuration panel where you’ll need to specify several important parameters:
Numeric input validation – Confirms only numbers are entered
Name and Identity: First, assign an appropriate field name and select the most suitable field type from the dropdown options. Create a unique identifier in the Custom Key field – remember to avoid spaces and special characters to prevent technical issues.
Display Options: Configure how your field appears to customers by entering a descriptive label and, if helpful, a default value that will pre-populate the field.
Technical Settings: Enhance data quality by selecting appropriate validation rules based on your field’s purpose. You can also add custom CSS classes for styling purposes if needed.
Business Rules: Determine whether the field is mandatory by toggling the Required setting. For administrative purposes, specify whether this information should appear in customer order emails and on the order details page.
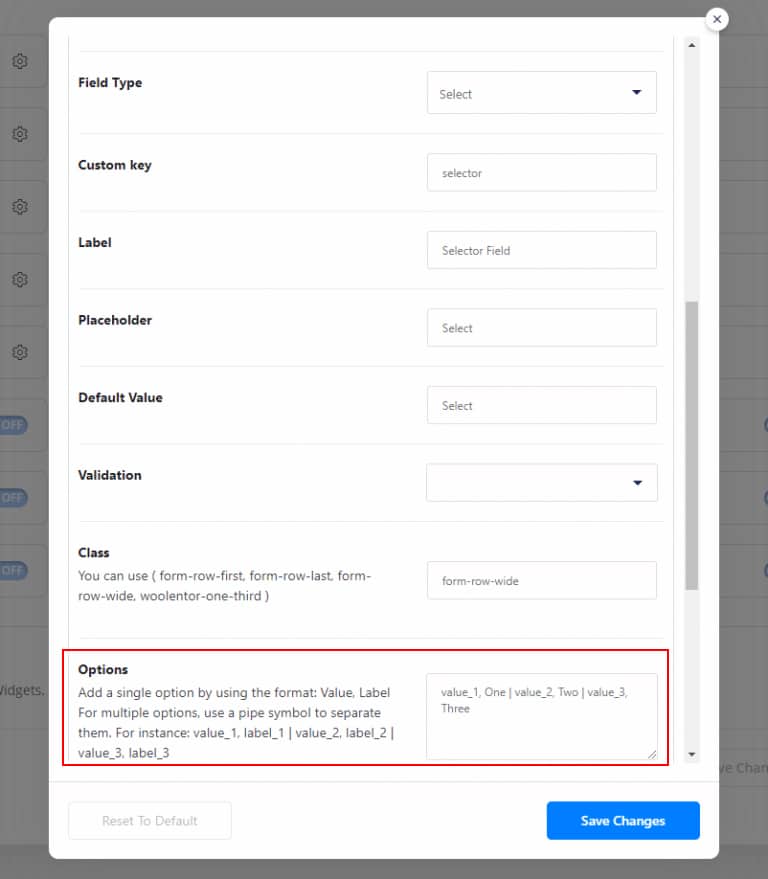
For fields that present customers with options (Select, Radio, Multiselect, or Checkbox Group types), you’ll need to define the available choices. Use the format “value_1, label_1 | value_2, label_2” to create a well-structured list of options separated by pipe symbols.
ShopLentor supports five validation types to ensure you receive accurate customer information:
- Email verification – Confirms proper email format.
- Phone number validation – Ensures correctly formatted contact numbers.
- Postal code verification – Applies region-specific formatting rules.
- State/province validation – Verifies geographical information.
- Numeric input validation – Confirms only numbers are entered.
Step 4: Edit/Update Checkout Fields
Once you’ve added or deleted fields, please click the “Save Changes” button to implement the modifications. Additionally, you can modify existing checkout fields or their labels according to your requirements.
After making all necessary adjustments, remember to save your settings to complete the customization process.
With these simple steps, you can efficiently customize WooCommerce checkout fields using the ShopLentor plugin, tailoring the checkout experience to match your specific business requirements and enhance user satisfaction.
Best Practices for Customizing WooCommerce Checkout Fields
Customizing WooCommerce checkout fields can enhance user experience and streamline the buying process. Here are some best practices:
Identify Necessary Fields:
Determine which fields are essential for your business and customers. Include only necessary fields to keep the checkout process concise and user-friendly.
Use Conditional Logic:
Implement conditional logic to display fields dynamically based on user input or specific criteria. This prevents overwhelming users with unnecessary fields.
Optimize Field Layout:
Arrange checkout fields logically and intuitively to guide users smoothly through the process. Group related fields together and maintain a clean layout to minimize confusion.
Add Helpful Labels and Instructions:
Clearly label each field and provide concise instructions or examples where necessary to assist users in filling out the form correctly.
Enable Autofill and Validation:
Enable autofill features to populate fields with stored user data and validate input in real-time to prevent errors and ensure accurate information submission.
Customize Field Types:
Choose appropriate field types (text, dropdown, radio buttons, etc.) for each information you need to collect. Use custom fields for unique data requirements.
Frequently Asked Questions
Can I edit the WooCommerce Checkout page?
Yes, you can edit the WooCommerce checkout page either through WooCommerce settings for basic customizations or by using third-party plugins for more advanced changes.
How do I hide Checkout fields in WooCommerce?
To hide checkout fields, you can use CSS to make them invisible or employ a plugin like ShopLentor that allows for easy management of field visibility.
How can I remove unnecessary checkout fields in the WooCommerce Store?
Third-party plugins offer an easy way to remove any fields you deem unnecessary for your checkout process.
What Checkout field types are available for customization in WooCommerce?
WooCommerce offers various checkout field types for customization, including text fields, text areas, select boxes, checkboxes, radio buttons, date pickers, and file upload fields. These allow you to collect different types of information during the checkout process.
How do I add additional fields on the WooCommerce checkout page?
Additional fields can be added effortlessly using a plugin like ShopLentor’s Checkout Field Manager.
Conclusion
We have learned how to customize WooCommerce checkout fields in simple steps. By using the Shoplentor Checkout Field Manager module, you can easily add or remove fields, rearrange the order of fields, and even add custom fields to suit the specific needs of your online store. With this flexibility and control, you can create a seamless customer checkout process and increase sales.
So why wait? Take advantage of this powerful tool and start customizing your WooCommerce checkout fields today!